Canning Basics: Jarology

While canning lids come in just 2 sizes, standard and wide mouth, canning jars come in many different shapes and sizes which leads to the question, "Why so many jars?"

And the answer is, different foods like different jars.

Breaking jars into the two main categories and discussing by size, here are my recommendations for what jars to use for what applications.

Standard Mouth Jars. 


These jars take the smaller of the two lid sizes and are usually straight sided until the 16 ounce size which has "shoulders". The replacement lids and rings are slightly lower in price so over the long run, it is cheaper to can in the standard mouth jars.

2 ounce--Great for powerful goodies like Bacon Jam or Plum Marinade. Also good for dry spice rubs and other special seasonings.

4 ounce--For Jams, Jellies, Marinades, Hot Sauces and Salsas.

8 ounce(half-pint)--Jams, Jellies, Salsas, Fruit Butters, Relish, Tomato Paste, Pizza Sauce and single servings of fruit(to pack in lunches).

12 ounce Quilted Crystal--Jams and Jellies, Pickled Asparagus, Pickled Beans and other pickles prepared in long slim sticks.

16 ounce(pint)--Usually this is the smallest size of jar that has "shoulders" which are useful to help hold fruits and vegetables, that might tend to float, under the level of the liquid. Use these jars for apricot halves, plum halves, tiny pickled whole peppers, brandied fruits, spiced apples, tomato sauce, fruit spreads for larger families.

32 ounce(quart) --Whole & Chopped Fruits, apple sauce, dill pickles, fruit juices and fruit juice concentrates, pie filling.

Wide Mouth Jars. 
These jars take the larger of the two lid sizes. The lids for these jars are slightly more expensive but these jars are easier to fill without making a mess and are very desirable in cases where food is to be "arranged" as it is put into the jars. Also in most cases, wide mouth jars are as comfortable in the freezer as they are in the pantry and can be used as a replacement for plastic containers.


8 ounce(Freezer-Safe)-- Frozen Soups, Canned Relish and Sauces.

16 ounce(Freezer-Safe) Thick Sauces, like Apple Butter, that will be spread with a butter knife. Frozen Soup for 2 people.

32 ounce-- Whole & Chopped Tomatoes, Pickles.

64 ounce(half-gallon) Fruit Juices, Fermenting, Dry Goods Storage.


Special Jars
These, rather expensive, jars are great for gift-giving.


"Elite Platinum" 4 ounce(half-pint)-- Dipping Sauce, Pesto, Jams & Jellies to be given as gifts.

"Elite Platinum" 8 ounce(pint)--Hostess Gifts of Homemade Pickles & Sauces.

Fancy Pantry: Bloody Mary Supplies

One Quart of Bloody Mary Mix*:

Prepare tomato juice-
3 Pounds of red ripe tomatoes, stewed and strained through a fine sieve to make 4 cups of tomato juice

Measure the following into a clean 1 quart canning jar:
  • 3 tablespoons lemon juice
  • 3 tablespoons lime juice
  • 1 tablespoon prepared horseradish
  • 1 tablespoon Worcestershire Sauce, or to taste
  • 1 teaspoon minced garlic
  • 3/4 teaspoon hot sauce, or to taste (Make and use your own!)
  • 1 teaspoons salt (or to taste)
  • 1 teaspoon celery salt
  • 1/2 teaspoon freshly ground black pepper
 Fill jar with prepared tomato juice, leaving 1/2 inch headspace. Process jar in a Boiling Water Bath for 35 minutes.

Note: Horseradish loses it's heat over time so use this mix within a month or so. * Recipe adapted from Emeril's Bloody Mary Mix

Bloody Mary Pickle Mix
Into a 12 Ounce Quilted Jar:
  • 10 green beans, cut to fit
  • 4-6 small cauliflower florets
  • 2 cloves of garlic
  • 1 jalapeno pepper, cut into rings
  • 1 teaspoon of white or brown sugar
  • 1 teaspoon dill seed or dill weed
  • 1/4 teaspoon salt
Fill jar half full of vinegar(5% acidity) top up with clean tap water, leaving 1/2 inch headspace. Process in a Boiling Water Bath for 10 minutes.

Bloody Marys

When ready to serve, fill each glass with ice.

Add 1 ounce of vodka to each glass, then fill the glass with Bloody Mary Mix. Stir well and garnish with pickled green beans, and skewered cauliflower & jalapenos. Add other garnish as desired and call it a Liquid Salad!

Steam Canners -Still Not Recommended!

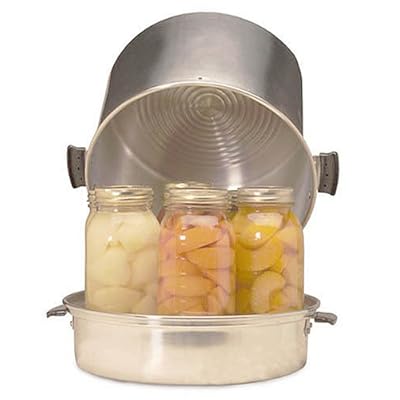
Steam canners are rather obscure in the US--they have been mostly replaced by the more highly-researched Boiling Water Bath Method. The basic idea is to process jars of food in live steam rather than immersing the jars in boiling water. This method is ONLY for high-acid foods.

If you insist on using this equipment for canning, follow these rules to the letter:
  • 1. Place appropriate amount of water in the base. Place the perforated cover over the base and bring water to a low boil.
  • 2. Pack and fill jars. Secure lids firmly, but not over-tight. Set each full jar on the base and allow it to warm up while packing and filling enough jars for one batch.
  • 3. When the last full jar has warmed up for 1-2 minutes, place the dome on the base and slowly (4-5 minutes)  increase temperature setting of the stove until a column of steam 8-10 inches is evident from the small holes at the base of the dome.
  • 4. Begin timing the process, maintaining the column of steam following the water bath canning recommendations adjusted for your altitude. Do not reduce temperature setting of the stove. The dome should not bounce from the base during processing.5. When processing time is complete, turn off the stove and wait 2-3 minutes before removing the dome. Remove the dome by turning it away from your face and body to avoid burns.
  • 6. Allow jars to cool and seal. Remove metal bands and store the jars in a cool dark place.
Extension researchers firmly advise against steam canning low acid (e.g., vegetables) or borderline acid foods (e.g., tomatoes). Under-processing these foods can lead to botulism food poisoning.


Taste of Spring

I seen kumquats at my local produce stand! This tiny member of the citrus family is a treat anytime, but you will only find them in the early spring.

Kumquat Chutney
This goes well with chicken, pork, lamb, and curry.
  • 6 navel oranges
  • 12 fresh kumquats or 1 (10 ounce) jar preserved kumquats
  • 1 red bell pepper, seeded and chopped
  • 1 green bell pepper, seeded and chopped
  • 1 onion, chopped
  • 1 cup raisins
  • 2 cups cider vinegar
  • 2 cups packed brown sugar
  • 2 cinnamon sticks
  • 6 whole cloves
  • 2 tablespoons finely chopped fresh ginger
  • 1/2 teaspoon cayenne pepper, or to taste
  • Salt and freshly−ground pepper, to taste
Cut the unpeeled oranges into 1/4−inch slices, and cut the slices into 6 or 8 pieces. Cut the kumquats into 1/4−inch slices. Combine all the ingredients in a large saucepan and bring to a boil over moderate heat, stirring frequently. Reduce the heat and simmer uncovered for 1 hour, stirring occasionally. Scoop out the cinnamon sticks and whole cloves, after cooking.

Ladle into sterilized jars and seal.Process in a Boiling Water Bath for 5 minutes. Will keep unprocessed refrigerated for up to 4 weeks. Makes about 5 cups or 5 1/2 pint jars.

Preserved Kumquats - Middle Eastern Style (found on Redacted Recipes)
The Middle Eastern and North African tradition of preserving lemons in salt results in an explosively strong and distinctive condiment for seasoning food. They are integral to many, many dishes-- fragrant tagines, marinades and all sorts of salads. The rinsed rind can be chopped finely and mixed with olives for an instant treat and a little preserved lemon pulp and rind adds a huge amount of flavor to any fish dish.

  • 2 one-pint containers of kumquats--scrubbed
  • Sea salt
  • Fresh lemon juice, as needed (about 6 lemons)

Pat the kumquats dry and cut off the stem ends. Make a single vertical cut 3/4 of the way through each kumquat. Fill each cut with as much salt as it will hold and place them into a sterilized wide-mouth quart glass jar. Compress them into the jar until no space is left and add lemon juice to cover. Seal and set aside. Do not refrigerate.

The kumquats will be ready to use when the rinds are tender, in about 2 to 3 weeks.

Refrigerate after opening.


Pickled Asparagus
Skinny, new asparagus are beginning to show up in markets--stock up on this treat!
  • 7 lbs asparagus
  • 7 large garlic cloves
  • 3 cups water
  • 3 cups white distilled vinegar (5%)
  • 7 small hot peppers (optional)
  • 1/3 cup canning salt
  • 2 tsp dill seed

7 "Quilted" 12 ounce jars(these taller jars make for prettier finished product.)

Wash asparagus well, but gently, under running water. Cut stems from the bottom
to leave spears with tips that fit into the canning jar, leaving a little more than 1/2-inch headspace. Peel and wash garlic cloves. Place a garlic clove at the bottom of each jar, and tightly pack asparagus into hot jars with the blunt ends down. In an 8-quart saucepot, combine water, vinegar, hot peppers (optional), salt and dill seed. Bring to a boil. Place one hot pepper (if used) in each jar over asparagus spears. Pour boiling hot pickling brine over spears, leaving 1/2-inch headspace. Remove air bubbles and adjust headspace if needed.

Wipe rims of jars with a dampened clean paper towel. Adjust lids and process in a Boiling Water Bath for 10 minutes.

Since the asparagus is cut to fit the jars in Fancy Style, there is a little waste in this recipe. Snap those cut pieces and use the tender parts to try this less-well-known recipe.

The "Other" Pickled Asparagus
  • Remaining Asparagus from recipe above
  • or 1 pound asparagus, snap off the bottom part and cut into 2 inch pieces
  • 1 small organic lemon(or 4 Kumquats), cut into very thin slices
  • 1/4 teaspoon caraway seeds
  • 1/4 teaspoon dried thyme
  • 1 teaspoon pickling salt
  • 1 tablespoon white or brown sugar
  • 5% acidity vinegar(about 1/2 cup)
  • clean tap water(about 1/2 cup)
In a small bowl, toss asparagus pieces, lemon slices, slat, sugar and spices together and then stuff the mixture into a pint (16 ounce) jar. Fill jar half-way with 5% vinegar. Then top off with clean water, leaving at least 1/2 inch headspace. Apply cap and process in a Boiling Water Bath for 10 minutes.

Want to learn more about Homemade Pickles? Come to Pickle Class!

Fancy Pantry 101: Flavored Oils, Vinegars and Syrups

Thoughtful gifts and useful products you can make in your kitchen: Flavored Oils, Vinegars, and Syrups bring an extra depth to home cooking!

This upcoming class will discuss and prepare 3 different products and give the tips necessary for safe home preparation.

Part 1) Flavored Oils. The variations of flavored oils is amazing but the average cost of $10.00 per small bottle is off-putting and the horror stories of illnesses traced to homemade oils is pretty scary! You can safely make these products at home by learning the rules.

Part 2) Flavored Vinegars. Add some tang and flavor to your salads and other cooking with your own homemade flavors. Adjust the strength to exactly fit your preferences!

Part 3) Flavored Syrups. Learn how to make flavored syrups and spice up the sweets on your menu!

This is a HANDS-ON CLASS. Each Participant will prepare products in class and take home a booklet of recipes and 3 bottles of products.

Where: Goods For The Planet, 525 Dexter Ave N Seattle, WA 98109

Bring: A hand towel or cloth shopping bag to transport your booty and your own fancy bottles, if desired.

Cost: $40 (Includes 3 bottles of products and a 40 page booklet of recipes.)

Class size: 8 people per session. No exceptions. Prepaid classes are valid for 1 year. If you find yourself unable to attend your assigned class, please email me to reschedule.

Class Dates(Click on desired session to Register and Pay):

UstaBees Recycled Goodies!

UstaBees Products available NOW!

Every UstaBee used to be something else and has been recycled and repurposed to extend its useful life. Check back and see what's new!


UstaBees Recycled
Nylon Produce Bags

  • Use in place of plastic produce bags
  • Jelly Straining Bag
  • Spice Bag
  • Sun Tea Bag
  • Can be used in most straining projects
    that call for cheese cloth

Lightweight
Machine Wash & Dry
Approx. 13"x13"
Drawstring Top


Set of 4 bags $14.99+$2.00 S&H


Welcome Grouponers!

Slideshow